Blog
How to Setup IonCube Loaders on Ubuntu 14.04 / 15.04
How to Setup IonCube Loaders on Ubuntu 14.04 / 15.04
IonCube Loaders is an encryption/decryption utility for PHP applications which assists in speeding up the pages that are served. It also protects your website’s PHP code from being viewed and ran on unlicensed computers. Using ionCube encoded and secured PHP files requires a file called ionCube Loader to be installed on the web server and made available to PHP which is often required for a lot of PHP based applications. It handles the reading and execution of encoded files at run time. PHP can use the loader with one line added to a PHP configuration file that ‘php.ini’.
Prerequisites
In this article we will setup the installation of Ioncube Loader on Ubuntu 14.04/15.04, so that it can be used in all PHP Modes. The only requirement for this tutorial is to have “php.ini” file exists in your system with LEMP stack installed on the server.
Download IonCube Loader
Login to your ubuntu server to download the latest IonCube loader package according to your operating system architecture whether your are using a 32 Bit or 64 Bit OS. You can get its package by issuing the following command with super user privileges or root user.
# wget http://downloads3.ioncube.com/loader_downloads/ioncube_loaders_lin_x86-64.tar.gz
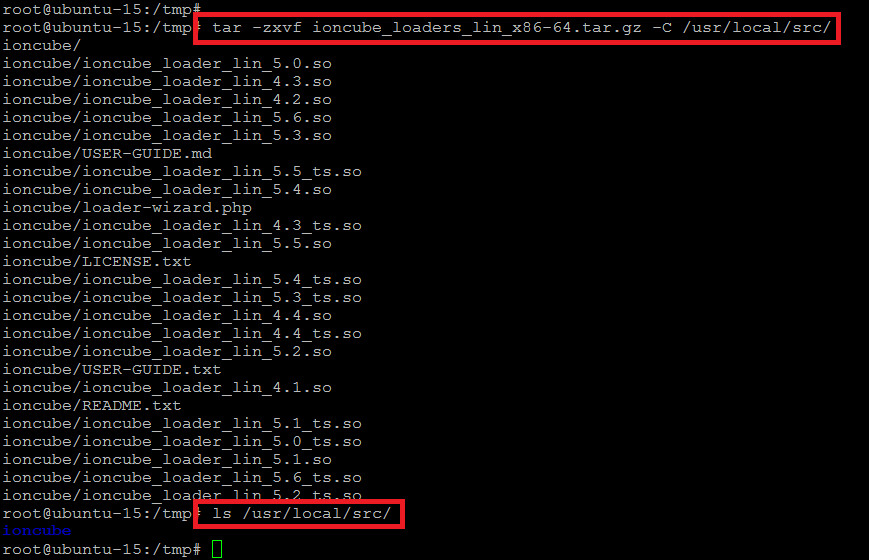
After Downloading unpack the archive into the “/usr/local/src/” folder by issuing the following command.
# tar -zxvf ioncube_loaders_lin_x86-64.tar.gz -C /usr/local/src/
After extracting the archive, we can see the list of all modules present in it. But we needs only the relevant with the version of PHP installed on our system.
To check your PHP version, you can run the below command to find the relevant modules.
# php -v
With reference to the output of above command we came to know that the PHP version installed on the system is 5.6.4, so we need to copy the appropriate module to the PHP modules folder.
To do so we will create a new folder with name “ioncube” within the “/usr/local/” directory and copy the required ioncube loader modules into it.
root@ubuntu-15:/usr/local/src/ioncube# mkdir /usr/local/ioncube
root@ubuntu-15:/usr/local/src/ioncube# cp ioncube_loader_lin_5.6.so ioncube_loader_lin_5.6_ts.so /usr/local/ioncube/
PHP Configuration
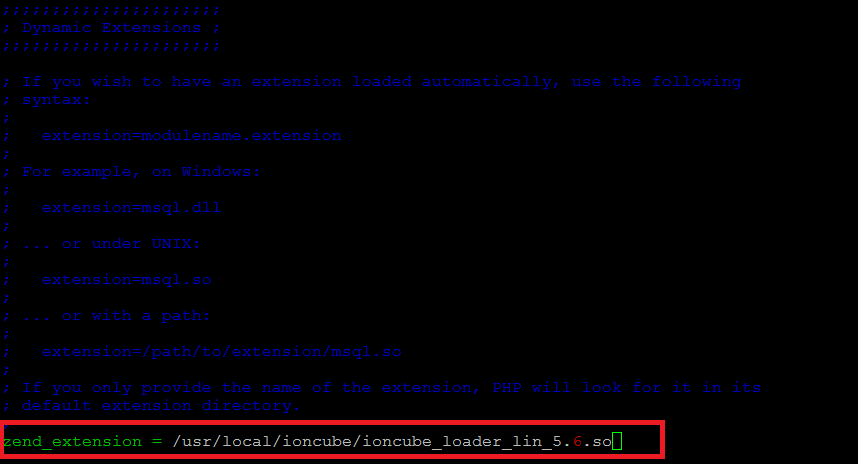
Now we need to put the following line into the configuration file of PHP file “php.ini” which is located in “/etc/php5/cli/” folder then restart your web server’s services and php module.
# vim /etc/php5/cli/php.ini
In our scenario we have Nginx web server installed, so we will run the following commands to start its services.
# service php5-fpm restart
# service nginx restart
Testing IonCube Loader
To test the ioncube loader in the PHP configuration for your website, create a test file called “info.php” with the following content and place it into the web directory of your web server.
# vim /usr/share/nginx/html/info.php
Then save the changes after placing phpinfo script and access “info.php” in your browser with your domain name or server’s IP address after reloading the web server services.
You will be able to see the below section at the bottom of your php modules information.
From the terminal issue the following command to verify the php version that shows the ionCube PHP Loader is Enabled.
# php -v
The output shown in the PHP version’s command clearly indicated that IonCube loader has been successfully integrated with PHP.
Conclusion
At the end of this tutorial you learnt about the installation and configuration of ionCube Loader on Ubuntu with Nginx web server there will be no such difference if you are using any other web server. So, installing Loaders is simple when its done correctly, and on most servers its installation will work without a problem. However there is no such thing as a “standard PHP installation”, and servers can be setup in many different ways, and with different features enabled or disabled.
If you are on a shared server, then make sure that you have run the ioncube-loader-helper.php script, and click the link to test run time installation. If you still face as such issue while doing your setup, feel free to contact us and leave us a comment.
STEP BY STEP
1. First check the O.S version by using below command
root@test:~# cat /etc/lsb-release
DISTRIB_ID=Ubuntu
DISTRIB_RELEASE=14.04
DISTRIB_CODENAME=trusty
DISTRIB_DESCRIPTION=”Ubuntu 14.04.1 LTS”
2. On your root directory create ioncube loader installation checking php file.
root@test:/var/www/html# nano loader-check.php
3. Now paste below code on loader-check.php file
<?phpecho var_export(extension_loaded('ionCube Loader') ,true);
4. Now open the file on your browser. In my case
http://104.236.61.177/loader-check.php
if you see “true” then IonCube loader is successfully installed. If you see “False” then IonCube loader is not installed on your server.
5. Now we need to find out which bit (32 or 64 bit) O.S we are using on server. To check use below command
root@test:~# uname –a
Linux test 3.13.0-36-generic #63-Ubuntu SMP Wed Sep 3 21:30:07 UTC 2014 x86_64 x86_64 x86_64 GNU/Linux
If you got the above result then you are using 64 bit version or else you will be using 32 bit version.
In my case I’m using 64 bit version of ubuntu O.S so I need to download 64 bit version of IonCube loader. You can download IonCube loader here.
6. Now download loader from official page. Make sure you downloading correct setup.
root@test:/var/www/html# wget http://downloads3.ioncube.com/loader_downloads/ioncube_loaders_lin_x86-64.tar.gz
7. Extract it.
root@test:/var/www/html# tar xvfz ioncube_loaders_lin_x86-64.tar.gz
8. Now open the loader-wizard.php file on your browser. Check inside the extracted folder. In my case it is located at
http://104.236.61.177/ioncube/loader-wizard.php
9. Once you open choose “Local install” option. Now it will automatically check what are the things we need to do.
In my case I’m seeing below errors.
Please note that the following problem currently exists with the ionCube Loader installation:
The necessary zend_extension line could not be found in the configuration.
Please note also the following issues:
Some functions are disabled through disable_functions. This may affect the operation of this Loader Wizard.
The correct loader for your system has been found at /var/www/html/ioncube/ioncube_loader_lin_5.5.so. You may wish to copy the loader from /var/www/html/ioncube/ioncube_loader_lin_5.5.so to /usr/lib/php5/20121212.
10. Check the php version by using below command.
root@test:/var/www/html/ioncube# php –v
PHP 5.5.9-1ubuntu4.4 (cli) (built: Sep 4 2014 06:56:34)
Copyright (c) 1997-2014 The PHP Group
Zend Engine v2.5.0, Copyright (c) 1998-2014 Zend Technologies
with Zend OPcache v7.0.3, Copyright (c) 1999-2014, by Zend Technologies
Form the above result I can see my php version is 5.5. Note it down somewhere.
11. Now check where our PHP modules folder is located
root@test:/var/www/html/ioncube# php -i | grep extension_dir
extension_dir => /usr/lib/php5/20121212 => /usr/lib/php5/20121212
12. Now we need to copy appropriate IonCube file to PHP module folder. So navigate to ioncube extracted folder and check 5.5 file. Because our PHP version is 5.5.
root@test:/var/www/html/ioncube# sudo cp ioncube_loader_lin_5.5.so /usr/lib/php5/20121212/
Notice: 5.5.so (loader file) and my PHP version 5.5.9 (check step 10) are same.
13. As per loader-wizard.php file we need to create one more file called “20-ioncube.ini” at /etc/php5/apache2/conf.d so use below commands to create it.
root@test:/var/www/html/ioncube# sudo nano /etc/php5/apache2/conf.d/20-ioncube.ini
now paste the content of 20-ioncube.ini file which you downloaded. In my case it is
zend_extension = /usr/lib/php5/20121212/ioncube_loader_lin_5.5.so
14. As per the official document now we need to restart server. If you try to restart ubuntu server by using below command
root@test:/var/www/html/ioncube# sudo service apache2 restart
* Restarting web server apache2 [fail]
* The apache2 instance did not start within 20 seconds. Please read the log files to discover problems
you will get error message. To check why it is causing you can visit
root@test:/var/www/html/ioncube# tail /var/log/apache2/error.log
PHP Fatal error: [ionCube Loader] The Loader must appear as the first entry in the php.ini file in Unknown on line 0
15. To fix this open apache2 php.ini file
root@test:~# sudo nano /etc/php5/apache2/php.ini
and add below line which you got on 20-ioncube.ini file. Make sure you are adding it on first line itself, that is above [PHP] entry.
zend_extension = /usr/lib/php5/20121212/ioncube_loader_lin_5.5.so
16. Now restart server.
root@test:/var/www/html/ioncube# sudo service apache2 restart


